We are talking about the coffee, and everyone wants to enjoy a great coffee – Don’t deny it!
But why do we settle for some cheap coffee instead of having the quality one? We always have that option.
Do we? Of course, we have! Do you know a particular machine called AeroPress? No? Fine.
Now sit back and relax because, in this article, you will know everything that this coffee maker has to offer and how to use Aeropress.
Is there a time that when you go into a restaurant or pub, ordered a coffee, and felt a disappointment as well as regret?
I’m not the only one who encountered this.
Everyone who is a fan of coffee had this kind of experience in their lives. Not once or twice, maybe numerous times.
The reason is the person who made the coffee didn’t know what’s the proper brewing process – or someone did it doesn’t have the idea of how a great coffee brewed.
Let’s get started.
How to Use AeroPress: A Modern Way to Brew Your Coffee
The president of Aerobie, Alan Adler discovers a coffee maker in the year of 2005, and it is known as the AeroPress coffee machine. Still wondering how to use the AeroPress device?
First, you need to let the coffee soaked for about 10-15 seconds, and you can press it by using the filter.
You need to insert enough pressure when you use this kind of coffee maker.
Advantages of Brewing Method Using AeroPress Machine
The brewing method of this coffee maker is like a bungee jumping. You need a thirty second of a moment for you to still awake before starting the activity.
The Aeropress coffee machine has a broader level of pH compared to drip coffee, an equivalent level of concentration just like with an espresso. So you’ll be feeling like you are the Flash while at your work.
Now that this espresso thingy catches your attention already let’s move forward on how to use an AeroPress machine to brew a tasty coffee.
While there are numerous ways on how to make an Aeropress coffee with the help of this machine itself, the following are the most used method:
How to Use AeroPress with AeroPress Inverted Method
This kind of approach will get you tricked through its requirement, and that’s about flipping of the machine.
Make sure that you are careful because you can get your hands burnt by the heated water inside.
You’ll be needing:
- Coffee – approximately 17 grams as a startup in the morning
- Water – 200 grams
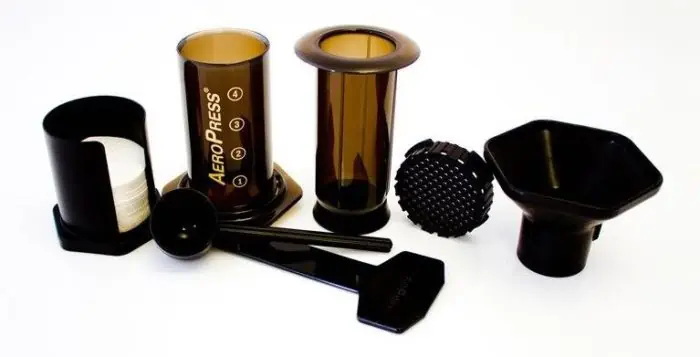
- AeroPress Coffee Machine – of course, how can you start brewing without this machine, right?
- AeroPress filters – you cannot live without coffee filters
- AeroPress Funnel – We know that you don’t want to see yourself cleaning substances that didn’t fall adequately in the machine
- Kettle – self-explanatory, don’t need to explain further
- Grinder – most people want a ground coffee
- Digital scale – this will help you determine the exact amount of coffee you’ll be using
- Timer – you don’t want to get your coffee burned
- Stirring tool – this material will help you mix the mixture evenly so it will taste great
- Coffee cup – enjoy your java in your favorite container
Let’s get it on!!
STEP 1: First and Foremost
Ready your 200g of water as well as your 17g of coffee.
If you are having a hard time to determine the proper ration of the two substances you are using, look for a scale in your kitchen.
Get the coffee and put it in your grinder. Grind it until you get the proper texture – more excellent than the iodized salt.
STEP 2: Use the AeroPress Filter
Place the AeroPress filter on the removable cap that’s colored black.
STEP 3: Ready Your Cap
Before we proceed, water the black cap first as well as the filter. In that way, the screen and the cap will function together accordingly.
It will also help to get rid the flavor of the filter so it won’t mix in the taste of your coffee.
STEP 4: Put Together the Machine
Now is the time to get your AeroPress assembled. Ensure that all the components are clean.
Check the entire device and inspect if there are any cracks or physical irregularities.
Be sure that your AeroPress is completely dry because the moisture can affect the quality of brewing.
STEP 5: Place the Machine Carefully
Place your Aeropress in an upside down position adjacent to the scale.
STEP 6: Putting the Coffee
Next, put the ground of coffee in the machine.
Make sure that no substances that will fall to the apparatus.
If that happens, immediately clean it so it won’t have to affect the brewing process.
STEP 7: Adding the Water
Heat the water until it reaches 90°C then after that, put the water into the device.
It is advisable that water is two times more compared to coffee.
In our part, we use 15g of coffee and 34g of water.
STEP 8: Inspect If Everything Works Smoothly
The coffee must be wet thoroughly and continuously.
To make sure that it will attain that kind of outcome, tap it with a spoon lightly.
STEP 9: Consider Some Safety Precautions
Fill the chamber using the remaining hot water.
Make sure that the machine is placed on the table so your hands won’t get burned by boiling water.
STEP 10: Patience is All You Need
Wait for a couple of minutes, then use your stirring tool to mix your coffee. Make sure to mix it evenly.
STEP 11: Almost Done and Ready
Put the black cap on the chamber making sure that it is secured.
You have to flip the instrument quickly but still sustaining the control – that’s the trick! Keep flipping the device, and once you see the numbers positioned correctly in its proper places, that’s the hint that you need to stop flipping.
Apply pressure in a downward pattern to the opposite side of the instrument.
Once you hear the sound of hissing, that means that the coffee reaches the end of brewing process; it also means that water has consumed against the device.
Press the plunger slowly and lightly. Press it evenly to prevent yourself from any accidents or spilling.
If you push it with a pressured hand, you will accumulate the deposits of the coffee, and it will have a bitter taste. But if that’s what you want, then push it in a hard way.
STEP 12: The-so-called Ugly Part
Unscrew the cap first and then once wholly unscrewed, removed the coffee filter and disposed of it.
Compressed the coffee grounds by pushing the interior part of the AeroPress.
Now you already know how to make Aeropress coffee without sweating!
As you brew and brew over time, the taste of your coffee will get better and better, and you master the right measure of coffee and water.
How to Use AeroPress with AeroPress Upright Method
As you brew your coffee using this method, you’ll be needing the same equipment and ingredients just like you use in an inverted way.
STEP 1: Heating the Water
Heat the water between the temperature of 195-205 degrees Fahrenheit.
Don’t let the water reach its boiling point because the coffee will burn out and it may have an effect to the taste of it.
STEP 2: Grinding the Beans
Put the coffee beans into the grinder and let it ground until it reaches the texture of iodized salt or finer.
20g of coffee beans is enough to make one cup of coffee.
STEP 3: Ready the Filter
Fill the filter with some water to eliminate the flavor of the paper. Few people use a metal filter, but it’s your choice.
STEP 4: Drop the Water and the Coffee
Ready your chamber. Put the coffee first to the chamber and shake it well.
Get the heated water and allow two minutes to rest so it will drop its temperature.
After giving it a 2-minute rest, pour a small amount of water inside the chamber.
STEP 5: Needing Enough Patience
Let the coffee interacts with hot water.
Don’t put all the hot water in there, and you need to wait for forty seconds then add the remaining water, stir, and leave it for sixty seconds.
STEP 6: Applying the Plunger
Now plunge the coffee out. Press it lightly and don’t do it quickly. Take your time because a significant and delectable coffee takes time.
Once the water is on the top of the coffee ground, you have stop now but if you want to have your coffee bitter and shard, continue pushing.
Once you already have your cup of coffee, rinse it with water and repeat.
Most people said that brewing coffee using the upright method has a different taste compared to the inverted way. Well, its for you to find out.
Recipes of AeroPress Coffee

Iced Coffee
For this recipe, you’ll be needing a ground coffee, plastic cup, a little bit of sugar, ice, and of course how can you do that without the AeroPress.
We’ll be using the inverted method, so here it is:
- Put the plunger inside the chamber.
- Add the coffee ground. If you will use a coffee scoop, put only three scoops.
- Add eight up to ten ounces of hot water.
- Stir the well the mixture, so the substances are evenly combined.
- Ready the ice and put it inside the plastic cup.
- Twist in the cap. Make sure to water the filter and the lid first.
- Put the AeroPress above the plastic container and gently press the plunger downwards.
- Keep pushing until there’s air between the plunger and compressed coffee. If you prefer a bitter coffee, push it once again.
- It’s up to you if you will add cream, sugar, or both. Add some ice if you want.
- It’s all done and enjoy your iced coffee.
Latte
To make an Aeropress latte, you will need the following: coffee, milk, sugar, mug, the AeroPress, and milk frother from Aerolatte.
- Ready your coffee by using an AeroPress coffee machine. It’s up to you if you are going to use the AeroPress upright method or the Aeropress inverted process.
- Once you already positioned the cup, allow the coffee to brew in a minute with the use of AeroPress.
- Ready your AeroLatte and put it in your favorite mug then begin to froth the milk. Repeat the process of frothing until it gets foamy. If you do not have an AeroLatte, you can try to look for a kitchen mixer and use it.
- Put the Aeropress on the top of your mug and press the plunger until there’s air between the plunger and compressed coffee.
- Now you’re done. You can put some sugar, cinnamon, or any spices you prefer.
- There are a lot of recipes you can do using your AeroPress coffee machine, and this is only some of it. Using an AeroPress requires to use your imagination and patience.
There are available tutorials online to find ways on how to use an Aeropress in making other recipes.
You can also read some articles form the internet to know more about this.
Conclusion
Now that you already know how to use AeroPress to make an extraordinary and delectable coffee, you can try to use both methods – the Aeropress inverted and upright way to experiment.
This Aeropress coffee machine will surely give you an outstanding taste of coffee and unique flavor.
It will let you have your coffee onto the next level.
Did you ever use this machine even once in your life?
Let us know your thoughts about it.